Mission Space Lab Mentor Guide

Stage 3 - The design thinking process
One way to approach the Mission Space Lab activity is for teams to follow the design thinking process. This is a great way to help them ask themselves questions and talk about how they will tackle the problem, their desired program output, and how they will test their program.
The design thinking process
Empathise is where you think about who will be using the program you are making. In this Mission, your team needs to create a program that will be executed automatically by scheduler software that is remotely administered from the ground. What kind of checks might their program need to make to ensure that it can deal with any unexpected data?
Define is where you pinpoint the problems you are aiming to solve. In this Mission, your team already knows the general problem, but what are the underlying issues? Can your team list all the things that their program will need to include to be successful? If their program uses photos of Earth, how will their program cope with the different views that might be visible from the window on the ISS during their 10-minute runtime? How will they make sure their program stops and produces a result by the end of their 10-minute runtime?
Ideate is all about generating ideas to find different ways of addressing the problem you have defined. You could try brainstorming, a common approach for exploring different ideas. Your team can let their imagination run wild! Once your team has a few different ideas, get them to compare and rate them to decide on the best options. They should consider what kind of data they will use, how they will collect it, and what processing will be required. Some of their ideas won’t be viable, but discussing what won’t work will help them move towards an idea that might.
Prototype is the proof of concept stage. The key element of this Mission is calculating the ISS’s velocity from data. At this point, can your team create an algorithm that will produce a sensible answer given pre-prepared static data? For example, if their approach uses photos of Earth as suggested in this project guide, does it work for a range of historical photos? Once your team is confident they have a good method of making the calculation with historical data, they will need to update their program so that it uses live data from the camera and/or sensors on an Astro Pi computer.
Test is where your team verifies that their program is performing as intended. Once the prototype is ready, your team should move on to using the Astro Pi Replay tool, which provides access to unknown simulated data. The Replay Tool allows them to test their program without the need for a Raspberry Pi computer, a high-quality camera, or Sense HAT. Does your team’s program run for 10 minutes? How many values for the velocity can be calculated in that time? If they differ, is an average value sensible or will conditions affect whether certain values should be discarded? Your team will also need to check that their program meets the other criteria outlined in the creator guide. There are important requirements such as where files can be saved, how the final answer should be recorded, and which Python libraries are allowed. This review loop will help your team polish and refine what they have made.
Working with your team to ideate and prototype
Five questions to get started
To help your team start planning their program, you could meet together as a team and try to answer the questions below. This should help your team decide how they are going to work together and set some expectations. Make sure everyone gets a turn to speak.
How are you going to make decisions as a team? Will you all have a say, or will you elect someone to take charge?
How can you utilise everyone’s strengths? What is everyone good at, and how can you help each other?
What does everyone want to learn? Don’t just do what you’re good at — try something new!
How much time do you have? Decide when and where you will meet, and how often.
How will you work together? Will you work online or mostly in person?
Timeline
Encourage your team to decide on the ideal date they would like to finish writing their program. They should make sure they have enough time to test it fully before submitting it, and to check it against the requirements checklist.
Identify your measurements
Once your team has answered the five questions above and created a rough timeline for their work, they may want to note down the measurements and data they will need to calculate the velocity of the ISS. If they need help, you could encourage them to take a look at the creator guide, and the project guides and other resources listed earlier in this mentor guide.
Work out the key program tasks visually
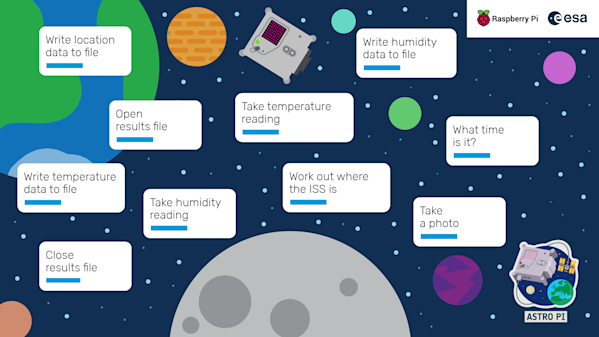
Once your team has a good idea of what they are trying to achieve with their program, the next step might be to work out the tasks that the program will need to do. Your team could do this visually using a pen and paper, a whiteboard, or online using a tool.
They could list all the key tasks their program will need to perform. They don’t need to worry about the order or the actual functions and commands at this stage — they should just note down the specific things that need to be achieved, like in the image below.
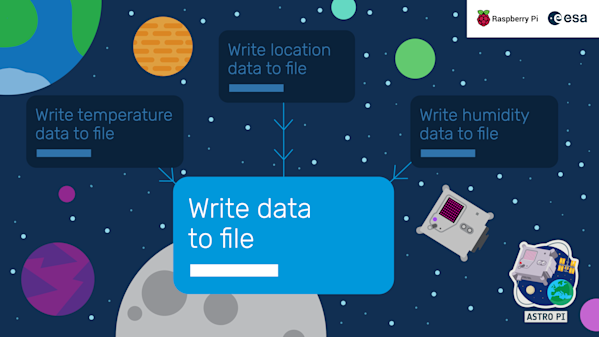
Subtasks
They could then have a closer look at each task and think about whether it can be split into smaller subtasks. They could check to see if there are any actions that can be combined with one another, or if there are any tasks that need to be repeated.
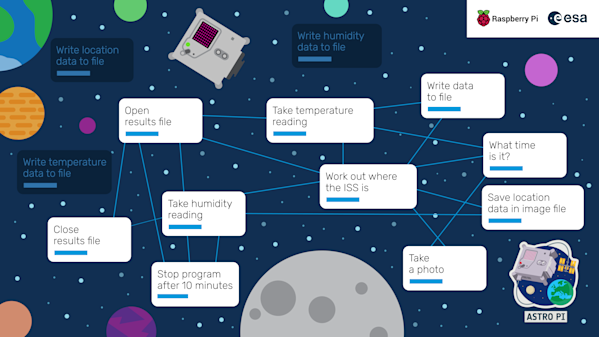
Put everything in a logical order
Next, they should try to put everything in a logical order, using lines to connect the various tasks. It will start to get messy, but they will probably discover that there are some obvious repeated tasks — these tasks are probably going to be written as functions that they will reuse.
If your team has been using a whiteboard or pen and paper, don’t forget to take a photo of their work to save it for later!
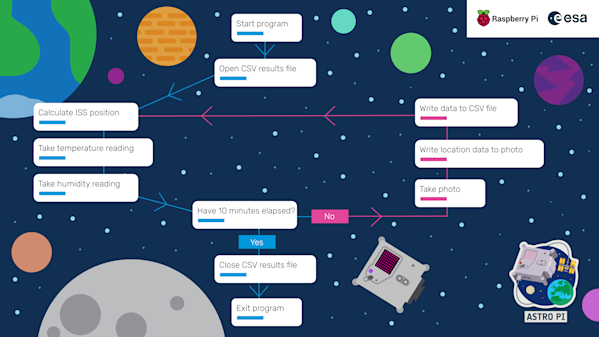
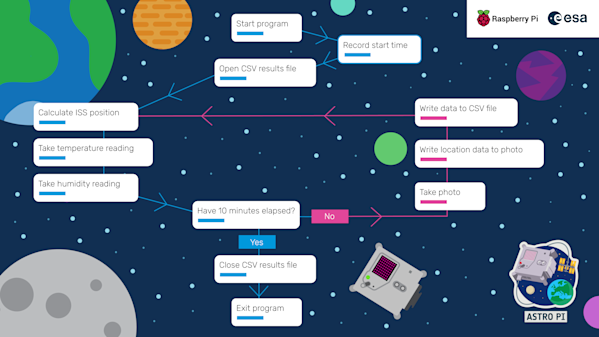
Draw a flow chart
Using their notes from the previous step, your team should try to refine the tasks into a flow chart, which is a diagram of all of a program’s tasks, in the right order, but does not contain any actual programming language commands. To do this, they could follow these steps:
- Identify the natural order of the tasks and try to use arrows to connect them in a sequence to create a ‘flow’ along the page, zigzagging a bit like a Snakes and Ladders board
- Identify any decisions that the program needs to make and check that all outcomes are catered for
- See which parts of the program will need to comply with the requirements for operation on the ISS (e.g. where files are saved, the output of the final result, and graceful exiting after 10 minutes)
- Include a ‘start’ and ‘end’ block to make it very clear where the program begins and finishes
Consider ‘what-if’ scenarios
An important aspect of programming and design is making sure you are ready for when things go wrong. Most experiments will have a main loop that runs repeatedly over the 10-minute period. An unexpected error encountered in this loop could be disastrous if it causes the program to stop or stall and prevent further data collection. So, encourage your team to think of some ‘what-if’ scenarios. For example, if their program involves reading data from a sensor, what will happen if it gives an unexpected result? Will their program cope with this? How would their program handle hardware errors?
Assign tasks to members of the team
Once your team has finished their flow chart, it is a good idea for them to review it all together. Once they are satisfied, they could assign tasks by following these steps:
- Give descriptive names to each task block
- Assign responsibility for each block to different members of the team, keeping in mind their experience and wishes
- Remember that someone needs to be responsible for the scaffold of the final program that will contain the various function calls in the right order
Your team may want to use a project management tool to track their tasks.
Track your work
Whatever method they choose to track their work, they should make sure to schedule a time to meet regularly to discuss progress and work through any major challenges as a group. They may find it useful to update their pseudocode flowchart to reflect any changes that they realise are necessary as they write the actual program.

